
Here is a brief listing of some helpful tips and do's and don'ts for those who like to take their rifles into the field :
The first thing you must decide is whether or not your rifle is going to be a wallhanger. If you have more money than you will ever know what to do with, disregard this page entirely. for the 99.9% of us who don't, keep reading. Rule of thumb is generally not to shoot a collector grade rifle, and if you must, do so only sparingly with commercial or light handloads. To more properly define collector grade: an all matching rifle with original factory finish, or something exceedingly rare. You could potentially turn a $1200+ rifle into a $500 parts gun. here is a safety checklist: 1. replace the internal bolt recoiling and operating rod springs with brand new manufacture replacements...otherwise, you might as well run in a demolition derby without a seat belt. just doing this one task will greatly reduce potential for parts breakage due to weak or "set" springs and improper recoil cusion of the operating parts. Itemizing the cost breakdown of replacement parts which are most frequently damaged or broken due to this one item: -extractor assembly (may break or shed itself several yards away into the grass) $60-100 not to mention cracking or breaking the stock and handguard - just try and replace those puppies! ....as compared to: here is a link to find these springs cheaper than anywhere else in the world: Spring sets 2. Buy an inexpensive Shooter's kit replacement gas restrictor system from Rob. He designed and produced these himself to exacting tolerances to get the most efficient, and safe combonation. 3. remove the dust cover, or replace the stamped sheet metal bolt housing with one which does not have a dustcover if you do not wish to potentially weaken or damage it by repeated removal and replacement every time you shoot. remember that original dust covers are of a very limited supply and can cost a whole day's pay or more! they are exceedingly prone to jamming as well, and the bolt carrier will frequently "stick" at the rearmost position as it jams the dustcover between it and the housing. 4. keep all load bearing and friction bearing parts well greased and oiled. -A real no brainer here, but you'd be surprised...and no heavy grease inside the firing pin carrier...a buildup could cause the firing pin to stick, and double or triple some rounds!!... 5. replace your sling if it is original, with a new made reproduction, and keep the original in your safe or gun cabinet away from harm while you shoot.....the repro's look great, and are 1/5 the price! Slings 6. if your rifle does not have a front sight hood....get a repro to protect the front sight blade!! sighthoods can be found here: Sight hoods 7. it is always a good idea to have one or more of the following replacement parts, they do come in handy, and all will fit in the trapdoor compartment of the stock: firing pin, firing pin extension, extractor set, locking lugs, safety retainer clip. don't forget to search this page often for original parts: Parts specials 8. a good idea if you choose to shoot a collector grade rifle, is to buy a complete matching bolt assembly from another rifle to use for shooting...this can be costly, but will insure you will not break any matching numbered parts. head space is a concern, but as there is a limited supply of matching bolt assemblies, it may take some time in finding and trying a few in your rifle to find a good one. 9. try and find a late war style gas cylinder with the two gas venting holes in lieu of drilling out the matching one on your rifle... shouldn't be too hard to do, and it is well worth the $60-75 investment. 10. always clean thoroughly after using berdan primed, or otherwise corrosive surplus ammunition...it can ruin your bore in time and these critters are virtually impossible to properly rebarrel. 11. try to stay away from hotter surplus ammo like Yugo, Turk, and the wartime German marked Fur MG. this stuff is really high pressure and is meant for heavy machine guns, not for a delicate, over powered semi-auto with questionable late war steel alloys. Of special note to reenactors: do not, do not, do not ever blank adapt a collector grade rifle. your rifle is probably the most expensive item in your ensamble. buy a mismatched shooter, or even build your own rifle from parts (this can also be challenging, yet a lot of fun, and a good winter project!) make sure the rifle you plan to use has no collector value before you permanently modify it!!! There is a fellow I know whom at the moment is working on a very innovative new shooters kit for these rifles, and he is also an expert on blank adaptation and modification. I can put you in touch with him if you are interested....here is his web page
SHOOTER'S KIT! for some other great websites with loads of good Gewehr / Karabiner 43 information, visit my link page:
G43 and K43 links
-bolt carrier (interlocking foot may break off, front of carrier may crack in
half behind the foot.)
, original condition complete $125-175
-bolt (may crack or fracture in several areas), stripped $50-100
-locking lugs (may fracture), pair $50-85
-firing pin housing (may crack at the rear)
$75-100
-bolt housing $150-175
-complete safety assembly (retaining ring may break resulting in the loss of some or
all safety components)
$100+
-operating rod (may bend, break or mushroom out) $20-40
recoil assembly (can become mangled and unuseable), complete $40-60
-new set of springs $15 shipped.
Hey, I use these on my rifles. these make the gas system adjustable just like the Svt-40 and Fn-49! Each kit contains:
4 each Stainless Steel gas regulator plugs, with four different sized gas
relief holes pre-drilled
1 each Allen Wrench
1 set Written Instructions on usage.
Disassembly of the G/K43
Takedown and cleaning / reassembly of the G/K43
This is an article I wrote for thr K98k page a couple of years ago.
Once you have cleaned and oiled the parts: Frequent malfunctions and common problems of the G/K43
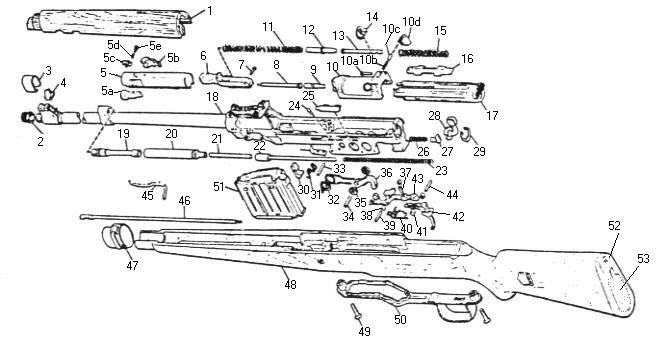
2. Muzzle cap
3. Front sight hood
4. Front sight blade
5. Bolt
5a. Left locking lug
5b. Right locking lug
5c. Extractor
5d. Extractor spring
5e. Extractor spring screw
6. Firing pin housing
7. Firing pin retaining pin
8. Firing pin
9. Firing pin extension
10. Bolt carrier
10a. Bolt hold open pin
10b. Bolt hold open spring
10c. Bolt hold open pin
10d. Bolt hold open lever
11. Recoil spring, front
12. Recoil spring guide, front
13. Recoil spring guide, rear
14. Bolt housing retainer
15. Recoil spring, rear
16. Receiver dust cover
17. Bolt housing
18. Barrel and receiver
19. Piston
20. Gas cylinder
21. Connecting rod
22. Actuator rod
23. Actuator rod spring
24. Ejector pin
25. Ejector spring housing
26. Safety spring
27. Safety plunger
28. Safety
29. Safety retaining clip
30. Magazine catch
31. Magazine catch spring
32. Hammer spring
33. Magazine catch spring
34. Hammer pin
35. Hammer washers (2)
36. Hammer
37. Trigger adjustment screw
38. Sear spacers (2)
39. Sear pin
40. Sear spring
41. Trigger spacers (2)
42. Trigger
43. Sear
44. Trigger pin
45. Front band spring
46. Cleaning rod
47. Front band
48. Stock
49. Trigger guard screw(2)
50. Trigger guard
51. Magazine
52. Buttplate
53. Buttplate trap door
Make sure the rifle is unloaded and safety in the safe position (facing right hand side).
Remove the magazine from the rifle by depressing the magazine catch button and pulling down and forward on the magazine. Remove cleaning rod if present.
If the rifle has a sling loosen it up a few inches. Now depress the front band spring, and slide the nose cap forward. you will now be able to remove the handguard. Turn the rifle over. there are two screws which hold the trigger guard in place. they have four notches in them that catch spring loaded pressure pins in the trigger guard. depress the pins with a small punch while loosening the screws. Once you have removed the screws, pull forward on the magazine catch to release the trigger guard. now the stock will slide off of the action.
Pull back on the charging handle all the way to the rear, and depress the hold open lever on the right side of the bolt carrier. At the rear of the receiver is a button (just above the safety) depress the button, and the bolt assembly will pull upwards and out of the receiver. *(Note: if you have a late Walther gun, there may not be a hold open catch. pull the bolt assembly to the rear approximately 1", and depress the takedown button,. the stamped metal bolt housing and recoil assembly will release from the top of the rifle, and remove. the bolt carrier with bolt assembly can now be pulled back and removed.) Now with the bolt in both hands cupped firmly, depress the hold open catch. the recoil springs will push the bolt open and you can now easily disassemble everything by hand. Beware! the parts are under spring tension, and will fly everywhere if you do not keep both hands firmly on them, and always protect your face! the recoil guide assembly and rear recoil spring can be easily disassembled, or cleaned and oiled as a unit.
To remove operating rod components:
Push the actuator rod rearwards to give clearance to remove the small joining dowel. now slide the rod and spring forwards and outwards. the gas cylinder can now slide rearward and off. the gas piston can be removed with a small crescent wrench. I would not recommend further disassembly of front or rear sights and trigger assembly unless absolutely necessary to remove broken or otherwise unusable parts. cleaning and oiling of these parts can be done in place.
Insert the firing pin into the firing pin housing. (long semi rectangular shaped piece).
Insert firing pin extension (small tapered rod with a notch in the thinner area) fat end first into the firing pin housing. (note: there is a small retaining pin in the rear of the firing pin housing that seats in the firing pin extension recess)
Insert the complete firing pin assembly into the bolt. bolt will have elliptical cut out in front facing up, as will firing pin housing. insert left and right locking flaps into bolt (this may take some practice to get right) and slide firing pin extension all the way in.
Note: locking flaps are not reversible. the right side flap has a groove on the bottom which corresponds to a bulge in the right side lug bolt channel.
Insert long recoil spring into rear of bolt, seated on top of firing pin extension. Insert complete rear (small) recoil spring assembly into stamped sheet-metal bolt housing so that take down pin pokes out the top rear hole and other two pins poke out the side rear holes. insert bolt carrier (handle) foot at the front into the elliptical cutout in the bolt making sure it seats also in the elliptical cutout in the firing pin extension.
Now slide the front recoil spring onto the rod assembly that is holding the rear recoil spring in the stamped housing. you will begin to experience tension. Align the bolt carrier to slide back over the recesses for it in the stamped housing. Continue to pull it back under tension as far as it will go- to the rear of the housing. Now, with the assembly all the way back, engage the hold open catch on the rear of the bolt. This should hold everything into place. Making sure the safety is in the on position, slide the bolt assembly front end first into the receiver until it "seats itself." simply depress the takedown button, and it will drop the rest of the way in and lock.
Now reassemble the rest of the rifle in the exact reverse order of disassembly.
1. Q. The gas cylinder assembly
on my gun cannot be removed by hand as it is either rusted or corroded on to the piston.(I have not tried to remove it with a pair of pliars which looks to be what it will take to remove it.) how do I go about removing it without damaging the rifle or parts? 2. Q. How do I install my front sight hood?? 3. Q. how do I put my safety back in my rifle?? 4. Q. how do I change out my worn out barrel? 5. Q. what should I use to clean my G43? 6. Q. How do you clean an old grungy stock? Stock Repair Service Is Your original G43 or K43 stock in need of repair? has it been duffle cut or sporterized? Well, before you go out and drop your wad on one of those $300 reproductions, why not try repairing your original? Tom Edwards does this service for you, and is very experienced. his services range from $40-$100 depending on how much work / time is involved, and will not only save you money, but also lets you keep the gun together with it's original configuration wood! He is highly recommended by us here at Gewehr43.com! Email Tom with all your stock repair needs! Tom's stock repair
7. Q. Is a plastic "bakelite" handguard correct on my Walther Ac code rifle?
8. Q. my G43's trigger travels quite a distance before the gun is fired. Is this typical of the G43 or is there an adjustment I can make? Ammunition: It is recommended that you clean your gas system after everytime you shoot. with the bolt assembly removed or locked to the rear, remove the handguard and gas system. spray the inside of the cylinder and all surfaces of the gas piston with commercial carburetor or brake cleaner... it is cheaper than the name brand gun solvents and works just as well. use only in a well ventilated area so you don't pass out or piss off the wife. wipe clean and then wipe the mating surfaces with a little bit of light oil to prevent rust. remove any excess oil. a pipe cleaner works well removing carbon fouling from the inside of the piston, and a .45 cal bore brush does fine for carbon fouling on the inside of the cylinder. this will prevent gas system freeze up or "seizure" down the line, a very common problem with these rifles.
How to tell if an advertised "unfired" gun is really "unfired" here are some ways to tell if the rifle has been fired:
if there is black residue on the inside of the handguard and stock around
the gas piston/cylinder area, and on the gas piston, if the gas piston and/or bore has
any pitting or corrosion, if there is a small ring of fine pitting on the
bolt face around the firing pin hole, If there is rub mark on the front of
the bolt carrier where the operating rod would strike. all these things mean
the gun has been fired.
A.
It is most likely corroded on. I had a similar problem with one of mine. I took it to the range and fired about 25 rounds of winchester commercial hunting ammo in it, and finally, the cylinder moved. (only about 1/2 inch). I took it home, and with a small gunsmith hammer and a brass block, gently tapped it the remainder of the way off. to remove the carbon buildup which froze these two parts, I used scotch brite pads (available in the kitchen isle at your local supermarket) to polish the piston, and inner cylinder wall. I then lightly oiled the metal, and wiped clean. I've never had a problem since. this is a common problem, and I think it has a lot to do with a vet shooting the gun once or twice when he brought it home, and then storing it for 50 years, leaving the uncleaned gas system to seize up. another good way to clean the inside of the cylinder is to take a .45 caliber bore brush and put it in your electric drill or dremel tool motor, and "have a go" at that pesky buildup inside.
A. I've found that using a flathead screwdriver works best. one that you can insert narrow ways into the bottom of the hood, and twist the screwdriver so that it gently pries on both prongs of the hood, opening them slightly, but just enough to start them over the sight ramp. then gently (this is tricky now, it might take a couple of tries) tap the hood back onto the ramp so that the prongs feed into the slots in the ramp and tap it back until it seats itself.
A. to install these is quite a chore.
you MUST have the receiver out of the stock wood. the spring goes in first,
followed by the plunger (you will be able to see where they fit).
the lever is next, followed by the retaining clip. you need to hold the
plunger in with a dowel, or screwdriver, and insert the lever. with good
dexterity, or a third hand, use a pair of snap ring pliers, or needle nose
to draw the snap ring together and insert it and it will lock in place.
(this procedure, when I do it, usually breaks a sweat on my forehead and
takes about 1/2 hour to get it right.) don't get discouraged if at first you
don't succeed! you will also see how the original and repro snap ring
differ. the original has a notch to keep it centered in the reciever. it's a
good idea to have a spare or two incase one ever breaks. and keep in mind,
they no longer make the originals, so the repro is as close as it gets!
a fellow collector shared this tip with me, and it makes this process a whole lot easier... with the gun out of the stock, insert the spring and plunger, and seat them to the farthest depth (in the safe position, blocking the sear.) insert the rear triggerguard screw and tighten it until it locks onto the safety plunger holding it at this depth. you can then insert the safety and retaining ring easily without the spring tension of the plunger working against you!
Removing a G/K43 barrel requires skill. replacing it a miracle. I seriously do
not recommend it. they are press pinned in place, not threaded like a k98.
since two barrels will have different dimensions, no two barrels will
interchange and properly headspace. don't get me wrong, it can be done, but
is not worth the effort and potential damage. I have removed three barrels
in my time. I have never replaced one, and never intend to.
first, you need to freeze the complete assembly. I'm talking a deep freeze
for days below zero. then, remove the barrel pin (sometimes easy, sometimes
not.) then torch heat the receiver until it smokes with evaporating oil.
(you must before all of this, have removed everything which is attatched to
the barrell, i.e. sight assembly, gas port, etc.)
now, the barrel must be pressed with a hydraulic press rearward out of the
receiver. I do not recommend driving with a hammer, as this can and will
bend the receiver. (not to mention ruin the crown on your barrel).
that is how to remove. since I have never installed one, I can't rightly
say.
A. as far as cleaning goes, if you use surplus corrosive ammo clean asap with a good soap and water or water/ammonia combonation first before regular cleaning practices, or use something else to neutralize the corrosive primer salts such as us.gi. ww2 bore cleaner. (just don't get any on you!) the bolt can be easily removed in 1 piece for cleaning the bore, the bolt face should also be cleaned, as well as the gas cylinder and piston to remove the corrosive residues. if you use commercial ammo, shoot and don't worry about it, clean as you would any other rifle with commercial ammo.
A. here is a good link to a page Darrin Weaver wrote on this subject: Stock cleaning
A. I have seen a few Walther (Ac) code guns with the phenolic resin handguards
(Durofol marked) but I am skeptical as to wether this is original. I think
that the bakelite jobs on Walther guns were done by vets and collectors post
war because they had a "cool" look to them. they are no more durable than
the laminated wood, and break just as often in the same places. they are
much less common however. as far as I have found, Berlin Lubecker (Duv,
Qve) was the only one of the three manufacturers to officially use the
phenolic handguards on rifles from the factory, and these rifles with such
handguards follow fairly tight serial number patterns.
A. this is fairly typical, and yes, you can adjust it.
remove the bolt group from the rifle, and you will see on the top middle of
the sear, a tiny set screw. turn this screw with a small flathead jewelrey
screwdriver to adjust the trigger pull....I've found that I can adjust these
to a "hair" trigger on my rifles, but doing so will place the rear of the
sear in the path of the safety plunger, making the safety inoperable, so I
find a happy medium where the safety is still functional, and the trigger
pull is tighter....interestingly, it seems BLM hardened these set screws and
Walther did not. it is fairly easy to bugger or break a walther set screw if
it is tight.Sighting the Zf4:
This is my recommendation for sighting in the scope on a rifle. first, remove all three locking screws from both the windage and elevation drum covers on the scope body, and remove the cover plates. Set the rifle on a fixed bench rest position aimed at a 100 yard target. Make it sturdy, I find that a couple of sand bags under the fore end work like a champ. Position the rifle so that the iron sights are dead on the target at 100 yards. Now look through the scope and see where the post is aligned. Turn the adjustment screws on the inside of the drums to line up the post reticle to the identical spot that the iron sights are. Now turn the drums so they read 100 yards for elevation, and center the windage. Replace the drum covers and screws, and test fire a 3 to 5 shot group. repeat this process as necessary to achieve the desired results. It should only take a few minutes.
It would be wise to stay away from any milsurp Turkish, Romanian, Pre-1970's Yugoslavian, or any German Wartime ammunition marked: Fur MG (for machine gun).
Recommended ammunition for these rifles would be: Sellier and Belloit, any post 1970's Yugoslavian, Ecuadorian, Wartime German, Egyptian, Commercial hunting loads, and any handloads you may be able to tune out for your particular rifle. keep in mind that you should always treat milsurp ammo as if it is corrosive and clean accordingly, or you will ruin your barrel. and gas system. here is a link to cleaning after shooting corrosive ammunition. bore cleaning